I have now set up a new blog, dedicated to the route challenge that I will be undertaking very shortly.
The blog can be found by following this link.
Contents
▼
Thursday, 27 December 2012
Thursday, 20 December 2012
Tuesday, 18 December 2012
Route Challenge - Coming Soon
Thankyou to all who voted in my poll at the end of last month, it was much closer than I had envisaged. With 59% of you voting for a fictional route, that is what will happen.
Loosely based on an area west of London, the route will utilise the London to Brighton package enabling the use of the fantastic scenery assets and track enabling features such as super elevation. In fact, part of the layout I have chosen to replicate will utilise super elevation very well, which will hopefully give the route some character.
The challenge will take place sometime next week, shortly after Christmas over three days and more information will be given closer to the time. A new blog will be set up for you to follow, and regular updates will occur throughout the three days before the challenge will end, testing will commence and the route will be released.
In order to maximise route building time, I will allow myself certain allowances in order to plan and gain a head start. This will be the setting up of the route template, addition of DEM, creation of decals and any other preparatory work that I deem necessary. No track laying or scenery placement will occur until the challenge starts.
Friday, 14 December 2012
BCO Bolster C Pack - Released!
Malcolm (malkymackay) has just passed me yet another one of his fabulous creations, this time a BCO Bolster C Pack with three load options. Created to Malcolm's very high standard, I'd like to once again thank him for the effort and dedication he is showing by producing this stock.
The pack can be downloaded by visiting this link.
British Railways chose to build wagons to a GWR design, when it came to construction of Bogie Bolster C. The first Diagram (1/471) was basically the same as the last GWR wagons. In 1953 the design was modified with revised bogies to give the Diag 1/473 vehicles featured here. 870 wagons were built during 1953-56, across 5 lots, with construction undertaken by Swindon, Metro Cammell & BRCW. They are presented as empty, or with a selection of self-explanatory loads. The wagons are in nearly new mid-50's condition so would be ideal for the era of routes such as Woodhead.
Edinburgh to Glasgow - 3 New Scenarios
Following the release last night of the free extension to Edinburgh to Glasgow, I have released three new scenarios that all utilise the newly scenerised areas. Ranging from a 1hr 40min realistic freight experience, to a Scotrail stopping service and the East Coast "Highland Chieftan", all enable you to explore this fantastic extension.
Either search for my scenarios from within the workshop in TS2013, or follow this link.
Either search for my scenarios from within the workshop in TS2013, or follow this link.
Tuesday, 11 December 2012
Saturday, 8 December 2012
Friday, 7 December 2012
DPSimulation - Scenario Workshop
Are you aware that alongside the many scenarios on the official DPSimulation website, there are now over 20 high quality scenarios on the DPSimulation Scenario Workshop? In order to download these scenarios you can either enter the Workshop via the TS2013 menu and search for the scenarios, or alternatively follow this link.
From short passenger runs, to express Intercity services to full length freight scenarios, there is something for everyone. With over 12000 current subscriptions, the Train Simulator playing public seem to have responded well. Here are some comments.
From short passenger runs, to express Intercity services to full length freight scenarios, there is something for everyone. With over 12000 current subscriptions, the Train Simulator playing public seem to have responded well. Here are some comments.
Banbury Bound: Fantastic ... I have never driven this route before but i couldnt resist the draw of a 47 ... has a really good feel of genuine traffic, i suspect it came from a genine early 90s timetable, Not really scenario related but you can see the house I used to live in when i was a small boy, one of my earliest memories was getting really excited to see a Blue Pullman pass on the embankment from my bedroom window, ... i think from now on ill pay more attention to this route .. Quality scenario!
Day Of Disruption: An excellent and realistic scenario obviously a lot of thought has been put into making this one.It was a nice touch how darkness began to fall as the scenario progressed and just when you thought that everything was proceeding well once the HST got onto the WCML,the unexpected happens.Well done.
FEX1 - 4S31 York Holgate to Hunterston: Thanks for creating and sharing this excellent scenario. I love that it followed a typical freight timetable and routing as I appreciate an immersive experience when I am driving. Keen follower of your website and would recommend it to anyone. Highly recommended freight scenario.
SPT Class 101 Pack Released
The Strathclyde Passenger Transport (SPT) Class 101 has been released for TS2013 and can be purchased via Steam by following this link.
Although it features only one livery, the SPT Class 101 is a very welcome addition to the Scottish fleet, with potential scenario use on both WCML North and Edinburgh to Glasgow. Given these units were very prominent in the area in the early 90's, I can see plenty of value in this pack.
With TSX features included, most noticeably rain on the windows, the headlights are realistic for the class/era and do not light up the track like many modern clusters would. The physics are improved, although the unit is still a bit spritely, it doesn't take off like the units in the original pack did so provides a much more realistic experience. The sounds have also been tweaked and provide a much more realistic feel and the age old issue with the screaming rear unit has been resolved along with the removal of the interior "glow" that was very noticeable in the original version. Another welcome addition is the passenger view which brings back many memories of travelling down the Esk Valley line in my childhood. Finally, the cab has also received a makeover and gives a much more solid feel. All in all, the pack is a big improvement over the original and is still, in my opinion, one of the best looking units created for Railworks and latterly Train Simulator so far.
The pack also includes three scenarios, not a large amount but all are engaging and show off the capabilities of the unit. From a tutorial, which provides explanation of how the manual transmission operates to the other scenarios which depict realistic passenger operations in the suburban areas around Glasgow, there is enough there to get people started.
Although there is obviously debate around the internet regarding the value of this pack, I personally believe that although there are elements of it that may be warranted, much of it isn't. It isn't just a reskin of the original pack, even if the Steam Store description actually makes mention of it, nobody can accuse RSC of deception on that front! More than a reskin, there are definite improvements made and as with any product, the value I look for is not with the initial price, but what replay value can be gained from the product in the coming weeks/months/years. Given that this unit was so widely used in the Scottish region and also the scenario opportunities that are available, I believe there is much more value than what the initial price tag suggests.
Thursday, 6 December 2012
Screenshot Of The Day - 6th December
With GBRF suffering from a shortage of locomotives, hired in 66051 stands at Haymarket West on a diverted North Blyth to Fort William Alcan working.
Two New Free Rolling Stock Packs Released!
Malcolm (malkymackay) has just passed to me his latest creations, a Bolster C and Bolster E pack. Once again they are of a very high standard and I cannot thank Malcolm enough for once again taking the time to create these pieces of rolling stock.
The stock can be downloaded by visiting this link.
BCV Bolster C
Eight variants of BCV Vacuum Braked Bogie Bolster C steel carrying wagons, with 2 types of bogie. British Railways introduced fitted Bolster C's from 1958 & these models represent the 800 built by Swindon & Metro Cammell in 1958/59, to Lots 3155, 3162, 3200 & 3238, all fitted with Plateback bogies. The final two lots (3341 & 3397) of 600 Bolster C's were built with Davis Lloyd Cast bogies. These emerged from Swindon & Metro Cammell in 1961/62 and are denoted in the Asset List by having the suffix DL.
BEV Bolster E
Five variants of BEV Bogie Bolster E steel carrying wagons. British Railways introduced a brand new design of short bogie bolster in 1961, when 1200 wagons were produced as Lots 3343 & 3440 at Ashford. They were vacuum braked & fitted with Cast bogies and could carry a 30t load on a 32ft chassis. The wagons are presented as empty, or with a selection of self-explanatory loads. They are in late 70's/early 80's condition, by which time, the rated load had been increased to 32.5t.
Thursday, 29 November 2012
Weekend Challenge Poll - Vote Now!
Although I have all sorts of bits and pieces on the go, whether it be routes, scenarios or other hidden gems, there are times when I want to put it all down for a weekend and challenge myself. This is where I want user input by means of a poll which has two options, shouldn't be too hard to choose! So, the question is this.......
If I was to take on a weekend* challenge in order to create something for the community, what would it be?
1) Small Fictional Route
A small fictional, modern third-rail route using the London to Brighton add-on as a base requirement along with items from my own collection. An advantage of a small route is that I can look at extending in the future.
2) Scenario Pack
A scenario pack consisting of 4-6 scenarios either based on one or various routes with requirements that can be modified easily for use on the TS2013 Steam Workshop. The scenarios could be completely unrelated, or form some sort of "day in the life" format where the scenarios follow on from each other.
To the top right of this post there is a poll which you can vote on. With only two options, it shouldn't take much time to choose.
* My weekend consists of Friday evening and all day Saturday and Sunday.
Tuesday, 27 November 2012
Mk1 & Mk2e Coaches - Armstrong Powerhouse
A welcome announcement here, especially since I have been receiving a lot of requests for information due to these coaches being utilised in many of my scenarios.
Recently, Digital Traction announced that they would be discontinuing their Mk1 and Mk2e coach packs. The result of this meant that although there are many thousands out there that could still use the many, many scenarios that used them, new users would now struggle.
However, Armstrong Powerhouse have announced that they are taking over the publishing of these packs, and they are available now. In addition to this, they are not modified in any way and retain the original folder structure meaning that they will work out of the box in these scenarios.
They are available now by following this link.
Friday, 23 November 2012
The Central Route - Version 2 - TS2013
I completely forgot about blogging this one, it's certainly a route that is worth being aware of. The original route was featured in one of the early issues of the now discontinued "Right Track" magazine and ended up being a very, very popular route.
"The Central Route" V2 has now been released for TS2013 and features a whole host of upgrades to the original, again in six sections and with an unbelievable 95 scenarios in order to get you started.With TSX lighting now included throughout, along with some fantastic attention to detail, this is certainly one to take a look at.
It can be downloaded from UKTrainsim by following this link.
Please make sure that you read the download page and the included documentation for the requirements.
Tuesday, 13 November 2012
Workshop Scenario - All For Repair
Just a quick heads up for anyone that is interested in a good, lengthy freight scenario. "All For Repair" is based on the WCML North route and lasts for around 1Hr 45Min. Using a Class 31 locomotive, you are required to visit various locations around the Motherwell area in order to collect defective wagons for repair at Earnock.
This scenario can be found by clicking here.
There are also a lot more scenarios available from my workshop page which can be found by clicking here.
This scenario can be found by clicking here.
There are also a lot more scenarios available from my workshop page which can be found by clicking here.
Saturday, 10 November 2012
Friday, 9 November 2012
APStation Pack
Just a quick heads up for anyone that needs it.
The APStation Pack that is required for many routes including Cresston V4, is now available by clicking here.
A big thanks to Derek for making it available.
The APStation Pack that is required for many routes including Cresston V4, is now available by clicking here.
A big thanks to Derek for making it available.
Monday, 5 November 2012
Sunday, 4 November 2012
Wednesday, 31 October 2012
Monday, 29 October 2012
Monday, 22 October 2012
OHV 13t Highfit Wagon - Now Released!
Another fantastic wagon has been passed on to me for release by the prolific and talented Malcolm Mackay.
Following a slightly different theme this time, the OHV 13t Highfit Wagon are effectively steel bodied versions of the typical 5-plank open wagon that could be seen all over the network and carrying all kinds of loads. They were fitted with vacuum brakes from new and would have been lettered as HIGH FIT.
The wagons can be found in the "Rolling Stock" section of my website which can be found by following this link.
Another huge thanks to Malcolm for keeping this production line of high quality free stock rolling.
Monday, 15 October 2012
Route Building Pack - Nearly There
The first version of the route building pack is approaching release. Hopefully, if I can find some time later in the week I will be able to put the finishing touches to it and make it available. Version 1 currently has over 150 items and is focused on the UK.
Sunday, 14 October 2012
Amazing
Watched one of the most amazing things I'll probably ever see this afternoon. This was the moment of no return.
Cresston V4 - Crickfield Line Progress
More progress shots from Cresston V4 as the Crickfield line takes shape. This line will be completed for the next beta.
Tuesday, 25 September 2012
I'll Avoid This One!
One to avoid for sure. Took this picture on the seafront last week and completely forgot to post it.
Monday, 24 September 2012
Train Simulator 2013 - Tunnel Occlusion Part 2
Following on from part 1, it turns out that tunnel occlusion is not only useful for tunnels, but it can also be used to eliminate rain from any structure. We have all seen it before, sat in a major terminus with a grand roof overhead, but that grand roof has a major leak. Using a shed as an example for this guide, you can see what I mean below, the rain penetrates the structure.
In order to eliminate this, we have to go over a few steps covered in the previous guide. If you are already familiar with the basics from the original guide, you can of course scroll down.
The tool resides in the middle left hand menu, under "misc" and called "Tunnel Occlusion Volume"
In order to now use the tool and fix the unwanted moisture, we first have to place the tool. Fig 3 shows the tool in its placed, unselected state.
In order to select and manipulate the tool, you must click on the green
coloured arrows. As you can see, this then highlights the object (Fig 4)
and it is pretty similar to a decal, in that all faces have a selection
point which can be manipulated in order to change the size of the tool.
It's worth noting at this point that because those green arrows are
fairly dark, and with the likelihood of you working in dark confined
spaces, it's more ideal that you do all of your modifications before
moving the sized tool into place.
As you can see from Fig 5, I have once again pre-sized the tool in order to fit the structure.
This does however leave us with a potentially unwanted issue, a very noticeable shadow. This can be removed by highlighting the tool, then double clicking the green arrows. This will enable the right hand flyout to appear and it presents you with some options, in this case we are interested in colours which by default will be set to black. Simply select the white colour, this will lighten the shadow considerably but will still be nocticeable and maybe not wanted. To remove it completely, changed all of the three numbered fields so they read "0.999". This can be seen below in Fig 6 which also shows the result. It's also worth noting that these shadows may not neccessarily have to be removed, depending on the structure type, but you will be able to fine tune your own shadows to suit what you want.
The result is as can be seen below (or cannot be seen clearly, you will have to trust me on it) whereby the inside of the structure now has no rain.
This tool really does have some fantastic implications, not just on the tunnels and major structures such as stations and sheds, but can also be used more or less anywhere it would be required, under bridges for instance.
In order to eliminate this, we have to go over a few steps covered in the previous guide. If you are already familiar with the basics from the original guide, you can of course scroll down.
The tool resides in the middle left hand menu, under "misc" and called "Tunnel Occlusion Volume"
In order to now use the tool and fix the unwanted moisture, we first have to place the tool. Fig 3 shows the tool in its placed, unselected state.
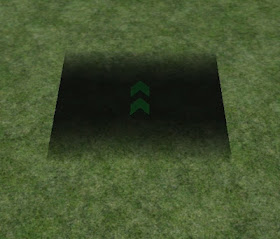 |
| Fig 3 |
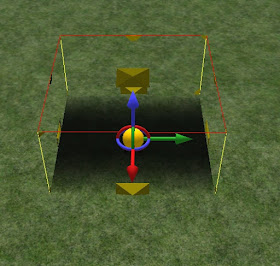 | |
| Fig 4 |
As you can see from Fig 5, I have once again pre-sized the tool in order to fit the structure.
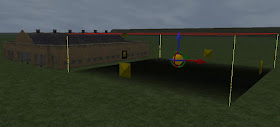 |
| Fig 5 |
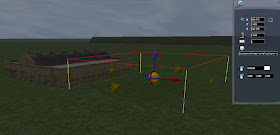 | |
| Fig 6 |
The result is as can be seen below (or cannot be seen clearly, you will have to trust me on it) whereby the inside of the structure now has no rain.
This tool really does have some fantastic implications, not just on the tunnels and major structures such as stations and sheds, but can also be used more or less anywhere it would be required, under bridges for instance.
Train Simulator 2013 - Tunnel Occlusion Part 1
Following on from my earlier blogs about new features included within TS2013, there is a glaring omission, tunnel occlusion which for the layman, making a tunnel darker. Many who are familiar with the program pre TS2013 will know that tunnels and in particular the darkness was not a strong feature of previous versions.
First, its worth pointing out exactly where this tool resides. In the middle left hand menu, under "misc" and called "Tunnel Occlusion Volume"
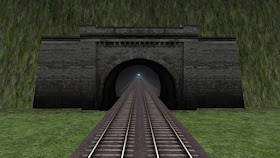
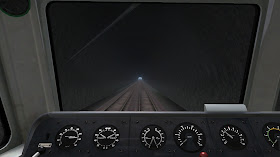
OK, the first thing we need to do for the purposes of this tutorial is create a basic tunnel (Fig 1) and with no modifications added, Fig 2 shows the view from inside the cab of a Class 47 which doesn't even have lights on and is at the mid point of a 800m tunnel. I don't think many could argue that it is far too bright in there.
In order to now use the tool and fix this, we first have to place the tool. Fig 3 shows the tool in its placed, unselected state.
In order to select and manipulate the tool, you must click on the green coloured arrows. As you can see, this then highlights the object (Fig 4) and it is pretty similar to a decal, in that all faces have a selection point which can be manipulated in order to change the size of the tool. It's worth noting at this point that because those green arrows are fairly dark, and with the likelihood of you working in dark confined spaces, it's more ideal that you do all of your modifications before moving the sized tool into place.
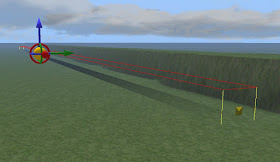
As mentioned above, you can see in Fig 5 that I have done all of my modifications outside of my pre-created tunnel. Once the tool has been placed inside, it's pretty difficult (but not impossible) to find those arrows again in order to make further modifications. You can also see from the image the way the tool actually works, where the shadow is getting gradually darker as it moves towards the middle of the tool, it then obviously becomes lighter again as you reach the other end.
Although this will be entirely user specific, I have found that placing two of these in the same place gives the best effect. This is easily done by simply copy/pasting your already sized tool before placing inside, and then placing both in the same location.
First, its worth pointing out exactly where this tool resides. In the middle left hand menu, under "misc" and called "Tunnel Occlusion Volume"
OK, the first thing we need to do for the purposes of this tutorial is create a basic tunnel (Fig 1) and with no modifications added, Fig 2 shows the view from inside the cab of a Class 47 which doesn't even have lights on and is at the mid point of a 800m tunnel. I don't think many could argue that it is far too bright in there.
 | |
| Fig 1 |
 | |
| Fig 2 |
 |
| Fig 3 |
 |
| Fig 4 |
Although this will be entirely user specific, I have found that placing two of these in the same place gives the best effect. This is easily done by simply copy/pasting your already sized tool before placing inside, and then placing both in the same location.
 | |
| Fig 5 |
This final shot shows the finished result once two tools have been placed. Again, taken from the Class 47 cab with no lights on, the shot is taken from exactly the same location as before. As you can see, much more darker and much more realistic.


